WordPress Posts/Blogs Filter with Search and Category Select/Dropdown, No Plugins

Take a look at the example inside the box below.

  1. We have a search box.
  2. We have category select box.
  3. We have a list of posts.
  4. We have a “load more” button.
  5. When we type anything on the search box it automatically filters the listed posts.
  6. If we select anything on the category, it filters the posts by category.
  7. Dynamically, the search box and the category select box work together. If we select a category, and type in keywords, it will only search and filter the post lists under that category.

Demo Example:


So how did I do that? It is simple, look at the code down below. Add it to your functions.php file.

// These lines of code register the 'custom_filter_posts' function to be called when an AJAX request with the action 'custom_filter_posts' is received.
add_action('wp_ajax_custom_filter_posts', 'custom_filter_posts');
add_action('wp_ajax_nopriv_custom_filter_posts', 'custom_filter_posts');

function custom_filter_posts() {
    // These lines retrieve the keyword, category, page number, and posts per page values from the AJAX request's parameters. If any of these parameters are not provided, they default to empty string, 1, and the default number of posts per page respectively.
    $keyword = isset($_GET['keyword']) ? $_GET['keyword'] : '';
    $category = isset($_GET['category']) ? $_GET['category'] : '';
    $page = isset($_GET['page']) ? $_GET['page'] : 1;
    $posts_per_page = isset($_GET['posts_per_page']) ? $_GET['posts_per_page'] : get_option('posts_per_page');

    // These lines construct arguments for the WP_Query object which will be used to fetch posts from the database.
    $args = array(
        'post_type' => array('post'), // Include both posts and pages
        'posts_per_page' => $posts_per_page, // Number of posts to display per page
        'paged' => $page, // Current page number
        's' => $keyword, // Search keyword
    );

    // Add category filter if a category is selected
    if (!empty($category)) {
        $args['tax_query'] = array(
            array(
                'taxonomy' => 'category', // Taxonomy to filter (in this case, category)
                'field'    => 'term_id', // Use term ID to filter
                'terms'    => $category, // The selected category ID
            ),
        );
    }

    // Perform the query to retrieve posts based on the provided arguments.
    $query = new WP_Query($args);

    // Check if posts were found
    if ($query->have_posts()) :
        // Loop through each post in the query result
        while ($query->have_posts()) : $query->the_post();
            // Display each post's title and excerpt
            echo '<div class="search-result">';
            echo '<h3><a href="' . get_permalink() . '">' . get_the_title() . '</a></h3>';
            echo '<small>' . get_the_excerpt() . '</small>';
            echo '</div>';
        endwhile;
    else :
        // If no posts were found, display 'No more posts'
        echo 'No more posts';
    endif;

    // Reset post data to ensure that global variables are restored to their original state after the query
    wp_reset_postdata();

    // Terminate the script execution
    die();
}


// Register shortcode
function custom_search_shortcode() {
    ob_start(); // Start output buffering
    ?>
    <div style="border: 2px solid #000; padding: 30px; ">
        <form role="search" method="get" class="search-form" id="custom-search-form" action="<?php echo esc_url( home_url( '/' ) ); ?>">
            <label>
                <span class="screen-reader-text"><?php echo _x( 'Search for:', 'label' ); ?></span>
                <input type="search" class="search-field" placeholder="<?php echo esc_attr_x( 'Search …', 'placeholder' ); ?>" value="<?php echo get_search_query(); ?>" name="s" id="search-keyword"/>
            </label>

            <label>
                <?php
                $categories = get_categories();
                if ( $categories ) {
                    echo '<select name="category" id="search-category">';
                    echo '<option value="">Select Category</option>';
                    foreach ( $categories as $category ) {
                        echo '<option value="' . $category->term_id . '">' . $category->name . '</option>';
                    }
                    echo '</select>';
                }
                ?>
            </label>
        </form>
        <br />
    
        <div id="search-results"></div>
    	<button id="load-more-btn">Load More</button>
    </div>
    

    <script>
    jQuery(document).ready(function($) {
        var postsPerPage = 3; // Number of posts to load initially
        var currentPage = 1; // Current page
        var keyword = $('#search-keyword').val();
        var category = $('#search-category').val();

        // Function to load posts
        function loadPosts() {
            $.ajax({
                type: 'GET',
                url: '<?php echo esc_url( admin_url('admin-ajax.php') ); ?>',
                data: {
                    action: 'custom_filter_posts',
                    keyword: keyword,
                    category: category,
                    page: currentPage,
                    posts_per_page: postsPerPage
                },
                success: function(response) {
                    $('#search-results').append(response);
                }
            });
        }

        // Load initial posts
        loadPosts();

        // Load more posts when the button is clicked
        $('#load-more-btn').on('click', function() {
            currentPage++; // Increment current page
            loadPosts(); // Load more posts
        });

        // Trigger search when the keyword input changes
        $('#search-keyword').on('input', function() {
            keyword = $(this).val(); // Update keyword
            currentPage = 1; // Reset current page
            $('#search-results').empty(); // Clear existing results
            loadPosts(); // Load posts with updated keyword
        });

        // Trigger search when the category dropdown changes
        $('#search-category').on('change', function() {
            category = $(this).val(); // Update category
            currentPage = 1; // Reset current page
            $('#search-results').empty(); // Clear existing results
            loadPosts(); // Load posts with updated category
        });
    });
    </script>

    <?php
    return ob_get_clean(); // Return the buffered content and clean the buffer
}
add_shortcode('custom_search', 'custom_search_shortcode'); // Register the shortcode

Then on your page, add this shortcode [ custom_search ]

If you are familliar with PHP and WordPress, just read through the code comments and try to understand.

Bootstrap Tagsinput – Manually adding class on loop-added tags

Bootstrap Tagsinput plugin is awesome. It has great functionality and lots of methods and functionalities it can offer. For more info about it, visit https://bootstrap-tagsinput.github.io/bootstrap-tagsinput/examples/

Let’s say you have this code.

<p><label for="npis">10 digit numbers</label><br />
<input type="text" id="num" name="npis" data-role="tagsinput" /><br />
<span class="v_error"> </span>
</p>

To initialize the Tagsinput plugin.

jQuery('input#num').tagsinput({
    tagClass: 'badge badge-default',
    maxChars: 10,
    trimValue: true,
});

Now, you want to check the input first before adding them as tags, let’s say numbers only and it should be 10 digit numbers separated by commas.

// event before add tag
jQuery('input').on('beforeItemAdd', function(event) {
    // event.item: contains the item
    // event.cancel: set to true to prevent the item getting added

    // check item if numbers only using regex
    var isNum = /^\d+$/.test(event.item);
    if(!isNum){
        jQuery('span.v_error').html("Enter multiple numbers separated by commas (e.g., 1234567890, 4567891231)");
        event.cancel = true;
    } else if(event.item.length !== 10){ // check if length of input is 10
        jQuery('span.v_error').html("Your numbers should be a 10-digit number.");
        event.cancel = true;
    } else {
        jQuery('span.v_error').html('');
    }
});

Now, what happens here is that, when you type in the keyboard, before the tags are created, it will detect first if there are letters or special characters in the input, if there are none and if the number input is equal to 10 digits, then the tag is created. Check the image below.

Bootstrap Tagsinput – Manually adding class on loop-added tags

Now the problem, you want to submit these numbers to an API, then the API checks what numbers are valid or not. Let us say, NPI numbers for doctors. Each doctor has a 10-digit NPI number. So the API checks in the server database which ones are valid or not, then responds back to the website browser which ones are valid/correct or invalid/incorrect. Now we want to display it to the user by highlighting the color, valid numbers are purple/lavender, just like the image above, and invalid NPIs are orange. Also you want to be able to still type in numbers in the input to resubmit.  In our case, by default, when a tag is created, I set the color to purple/lavender.

Here’s the solution.

First we need to create an empty array, this is where we will store the list of invalid numbers.

Check if there are invalid numbers by checking the length of the returned data array, then we iterate from there.

Then we use the add method from Tags Input to add the tags to the input box.

Then we push the invalid numbers to the empty array.

// create an empty array
let invalid_numbers = [];
// If number doesnt exist
// array_of_invalid_numbers will be an array of invalid numbers returned from the API
if(result_from_api.array_of_invalid_numbers.length){
    for (let i = 0; i <= result_from_api.array_of_invalid_numbers.length - 1; i++){
        // this is the Tagsinput method to add tags
        jQuery('input#num').tagsinput('add', result_from_api.array_of_invalid_numbers[i]);

        // we push the invalid numbers to the empty array invalid_numbers
        invalid_numbers.push(result_from_api.array_of_invalid_numbers[i]);
    }

    jQuery('span.invalid_error').html("Some numbers were not found in our database. Please remove or correct the numbers highlighted in orange.");
} else {
    jQuery('span.invalid_error').html('');
}

Then we get all tags added from the input box.

Then we loop through it using the jQuery function $.each().

Then we compare it to the invalid_numbers array.

Then remove or add classes.

// we get all tags by their class
// then we loop using the .each() function
// then we compare it to the invalid_numbers array
// if it matches then we remove the "badge-default" class and repalce it with "badge-invalid"
for(let inva_num = 0; inva_num < invalid_numbers.length; inva_num++){
    // this is the class generated to the tag inputs elements, check it in your browser console
    jQuery('.bootstrap-tagsinput span.tag').each(function(){
        if(jQuery(this).text() == invalid_numbers[inva_num])
        {
            jQuery(this).removeClass( "badge-default" ).addClass( "badge-invalid" );
        }
    });
}

The final result will be like this.
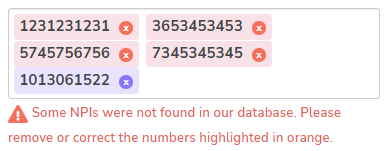
The orange ones are the invalid, and the purple one is the valid.

Why use PHP Namespace?

PHP Namespace is a virtual directory you create in PHP. It is used to avoid conflicts when declaring Classes in PHP.

In Object-Oriented Programming, it is best practice to place one class in one file, if there are 2 classes in 1 file then that just defeats the purpose of OOP. So why use Namespace? Here is an example.

In the index.php file, we have the code that:

  1. Requires 2 PHP files
  2. Instantiates the class A
require('first-class.php');
require('second-class.php');
$object = new A;

In first-class.php, we have a class and a method that displays a text.

class A{
    public function __construct(){
        echo "I am the first class A.";
    }
}

In our second file, second-class.php, we have a class with the same name.

class A{
    public function __construct(){
        echo "I am the second class A.";
    }
}

Now if we run the index.php file, we will get an error.

Fatal error: Cannot declare class A, because the name is already in use in C:\xampp\htdocs\php_tester\namespace\second_class.php on line 2

What happened is that the instance variable object is confused on which Class to instantiate. To solve this is to use namespace. This is important especially on huge projects and projects that use libraries. Namespace can also help collaborative projects for teams who code on a single project.

To use a namespace is simple. We add the namespace code at the top of the class and specify a name for it. In first-class.php file, we update the code to:

namespace FirstA;
class A{
    public function display_text(){
        echo "I am the first class A.";
    }
}

Now in our code in index.php, when we want to access the methods and properties under the first-class.php file, we update the following code to:

require('first-class.php');
require('second-class.php');
$object = new FirstA\A; //qualified class name

//result "I am the first class"

The code $object = new FirstA\A; is called the Qualified Class Name.

We can also place a namespace in our index.php file.

namespace FirstA;
require('first-class.php');
require('second-class.php');
$object = new A; //unqualified class name

//result "I am the first class"

Notice that I removed the namespace in the instantiation, we can call it as Unqualified Class Name.

But… how do we call the class under second-class.php? We do it by:

namespace FirstA;
require('first-class.php');
require('second-class.php');
$object = new A; //unqualified class name
echo "<br />"
$object = new /A; //fully qualified class name

We call it Fully Qualified Class name or FQCN.

We can also use the code “use“.

//namespace FirstA;
require('first-class.php');
require('second-class.php');

use FirstA\A as NewA

$object = new NewA; //unqualified class name
echo "<br />"
$object = new /A; //fully qualified class name

How To Install Laravel

How to install laravel is fairly easy. A beginner like can do it. Working on dependencies, Laravel uses PHP composer. You need to install Composer in your computer before installing Laravel.

First – Visit the following link and download composer to install it to your system.

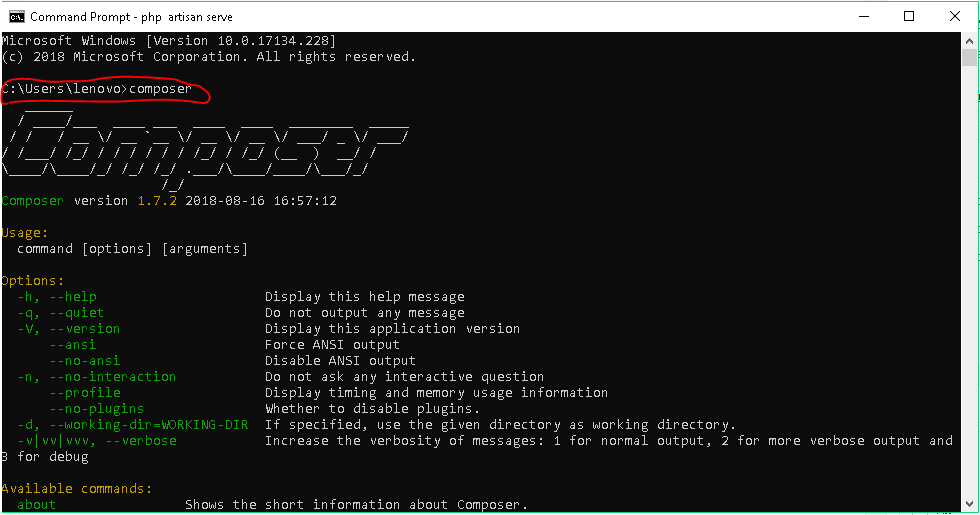
Next – After the Composer is installed, you can check if it’s installed properly in your system by typing “composer” in your command prompt.

command prompt composer laravel

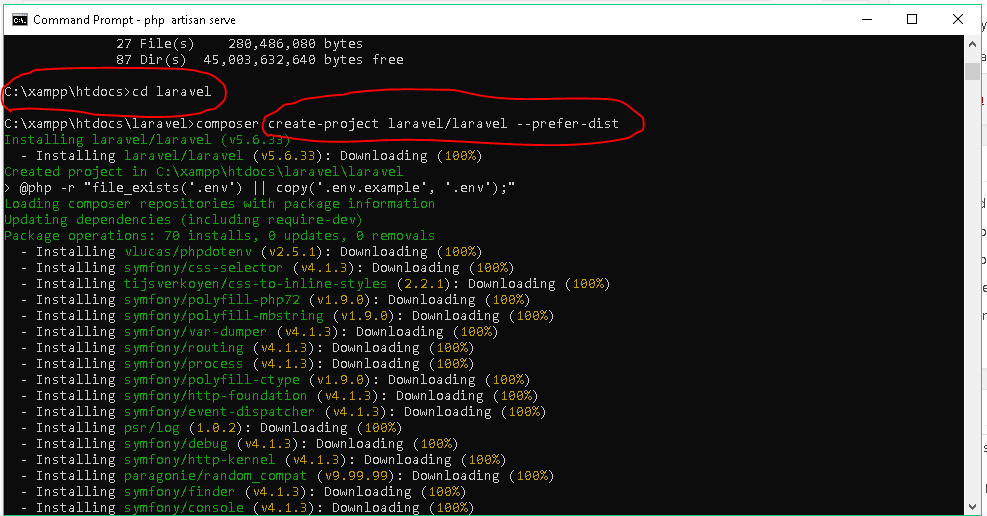
Next – Create a directory inside your working location, if you’re using XAMPP then go to C:/xampp/htdocs then create a folder. name it as the name of your project. I would name mine “laravel” so the directory would be C:/xampp/htdocs/laravel.

Open Command Prompt then go to the directory you just created, once inside, type the following code to start installing Laravel composer create-project laravel/laravel –-prefer-dist

composer create-project laravel/laravel –-prefer-dist

Wait for it to finish the install.

Next – To start the laravel service, type the following inside your laravel directory. php artisan serve

composer laravel php artisan serve

You may need to restart your computer after installing Composer.

Finish – Make sure that Apache server is running, go to your browser and type localhost/laravel/laravel/public/ for my project

laravel intro browser