How to make a slots machine effect counnter using HTML and CSS

25
24
22
20
18
16
14
12
10
08
06
04
02

Years

<style>
.experience_counter {
        display: flex;
        flex-direction: row;
        align-items: center;
        font-weight: 700;
        font-size: 32px;
        line-height: 1em;
        font-family: "Poppins", Sans-serif;
        color: #FFF;
        gap: 8px;
      }
      .experience_counter .container {
        height: 40px;
        overflow: hidden;
      }
      .experience_counter .slides {
        height: 480px;
        margin-top: -480px;
        will-change: transform; 
      }
      
      .experience_counter .slides{ animation-name: experience_counter;
          animation-duration: 1s;
         animation-delay: 3s;
        animation-fill-mode: forwards;
        animation-timing-function: ease-out; }
        
      .experience_counter .slide {
        height: 40px;
        display: flex;
        align-items: center;
      }

      @keyframes experience_counter {
        from {
          transform: translateY(0);
        }
        to {
          transform: translateY(480px);
        }
      }
</style>

<div class="experience_counter">
      <div class="container">
        <div class="slides">
          <div class="slide">25</div>
          <div class="slide">24</div>
          <div class="slide">22</div>
          <div class="slide">20</div>
          <div class="slide">18</div>
          <div class="slide">16</div>
          <div class="slide">14</div>
          <div class="slide">12</div>
          <div class="slide">10</div>
          <div class="slide">08</div>
          <div class="slide">06</div>
          <div class="slide">04</div>
          <div class="slide">02</div>
        </div>
      </div>
      <span>Years</span>
    </div>


WordPress Posts/Blogs Filter with Search and Category Select/Dropdown, No Plugins

Take a look at the example inside the box below.

  1. We have a search box.
  2. We have category select box.
  3. We have a list of posts.
  4. We have a “load more” button.
  5. When we type anything on the search box it automatically filters the listed posts.
  6. If we select anything on the category, it filters the posts by category.
  7. Dynamically, the search box and the category select box work together. If we select a category, and type in keywords, it will only search and filter the post lists under that category.

Demo Example:


So how did I do that? It is simple, look at the code down below. Add it to your functions.php file.

// These lines of code register the 'custom_filter_posts' function to be called when an AJAX request with the action 'custom_filter_posts' is received.
add_action('wp_ajax_custom_filter_posts', 'custom_filter_posts');
add_action('wp_ajax_nopriv_custom_filter_posts', 'custom_filter_posts');

function custom_filter_posts() {
    // These lines retrieve the keyword, category, page number, and posts per page values from the AJAX request's parameters. If any of these parameters are not provided, they default to empty string, 1, and the default number of posts per page respectively.
    $keyword = isset($_GET['keyword']) ? $_GET['keyword'] : '';
    $category = isset($_GET['category']) ? $_GET['category'] : '';
    $page = isset($_GET['page']) ? $_GET['page'] : 1;
    $posts_per_page = isset($_GET['posts_per_page']) ? $_GET['posts_per_page'] : get_option('posts_per_page');

    // These lines construct arguments for the WP_Query object which will be used to fetch posts from the database.
    $args = array(
        'post_type' => array('post'), // Include both posts and pages
        'posts_per_page' => $posts_per_page, // Number of posts to display per page
        'paged' => $page, // Current page number
        's' => $keyword, // Search keyword
    );

    // Add category filter if a category is selected
    if (!empty($category)) {
        $args['tax_query'] = array(
            array(
                'taxonomy' => 'category', // Taxonomy to filter (in this case, category)
                'field'    => 'term_id', // Use term ID to filter
                'terms'    => $category, // The selected category ID
            ),
        );
    }

    // Perform the query to retrieve posts based on the provided arguments.
    $query = new WP_Query($args);

    // Check if posts were found
    if ($query->have_posts()) :
        // Loop through each post in the query result
        while ($query->have_posts()) : $query->the_post();
            // Display each post's title and excerpt
            echo '<div class="search-result">';
            echo '<h3><a href="' . get_permalink() . '">' . get_the_title() . '</a></h3>';
            echo '<small>' . get_the_excerpt() . '</small>';
            echo '</div>';
        endwhile;
    else :
        // If no posts were found, display 'No more posts'
        echo 'No more posts';
    endif;

    // Reset post data to ensure that global variables are restored to their original state after the query
    wp_reset_postdata();

    // Terminate the script execution
    die();
}


// Register shortcode
function custom_search_shortcode() {
    ob_start(); // Start output buffering
    ?>
    <div style="border: 2px solid #000; padding: 30px; ">
        <form role="search" method="get" class="search-form" id="custom-search-form" action="<?php echo esc_url( home_url( '/' ) ); ?>">
            <label>
                <span class="screen-reader-text"><?php echo _x( 'Search for:', 'label' ); ?></span>
                <input type="search" class="search-field" placeholder="<?php echo esc_attr_x( 'Search …', 'placeholder' ); ?>" value="<?php echo get_search_query(); ?>" name="s" id="search-keyword"/>
            </label>

            <label>
                <?php
                $categories = get_categories();
                if ( $categories ) {
                    echo '<select name="category" id="search-category">';
                    echo '<option value="">Select Category</option>';
                    foreach ( $categories as $category ) {
                        echo '<option value="' . $category->term_id . '">' . $category->name . '</option>';
                    }
                    echo '</select>';
                }
                ?>
            </label>
        </form>
        <br />
    
        <div id="search-results"></div>
    	<button id="load-more-btn">Load More</button>
    </div>
    

    <script>
    jQuery(document).ready(function($) {
        var postsPerPage = 3; // Number of posts to load initially
        var currentPage = 1; // Current page
        var keyword = $('#search-keyword').val();
        var category = $('#search-category').val();

        // Function to load posts
        function loadPosts() {
            $.ajax({
                type: 'GET',
                url: '<?php echo esc_url( admin_url('admin-ajax.php') ); ?>',
                data: {
                    action: 'custom_filter_posts',
                    keyword: keyword,
                    category: category,
                    page: currentPage,
                    posts_per_page: postsPerPage
                },
                success: function(response) {
                    $('#search-results').append(response);
                }
            });
        }

        // Load initial posts
        loadPosts();

        // Load more posts when the button is clicked
        $('#load-more-btn').on('click', function() {
            currentPage++; // Increment current page
            loadPosts(); // Load more posts
        });

        // Trigger search when the keyword input changes
        $('#search-keyword').on('input', function() {
            keyword = $(this).val(); // Update keyword
            currentPage = 1; // Reset current page
            $('#search-results').empty(); // Clear existing results
            loadPosts(); // Load posts with updated keyword
        });

        // Trigger search when the category dropdown changes
        $('#search-category').on('change', function() {
            category = $(this).val(); // Update category
            currentPage = 1; // Reset current page
            $('#search-results').empty(); // Clear existing results
            loadPosts(); // Load posts with updated category
        });
    });
    </script>

    <?php
    return ob_get_clean(); // Return the buffered content and clean the buffer
}
add_shortcode('custom_search', 'custom_search_shortcode'); // Register the shortcode

Then on your page, add this shortcode [ custom_search ]

If you are familliar with PHP and WordPress, just read through the code comments and try to understand.

Bootstrap Tagsinput – Manually adding class on loop-added tags

Bootstrap Tagsinput plugin is awesome. It has great functionality and lots of methods and functionalities it can offer. For more info about it, visit https://bootstrap-tagsinput.github.io/bootstrap-tagsinput/examples/

Let’s say you have this code.

<p><label for="npis">10 digit numbers</label><br />
<input type="text" id="num" name="npis" data-role="tagsinput" /><br />
<span class="v_error"> </span>
</p>

To initialize the Tagsinput plugin.

jQuery('input#num').tagsinput({
    tagClass: 'badge badge-default',
    maxChars: 10,
    trimValue: true,
});

Now, you want to check the input first before adding them as tags, let’s say numbers only and it should be 10 digit numbers separated by commas.

// event before add tag
jQuery('input').on('beforeItemAdd', function(event) {
    // event.item: contains the item
    // event.cancel: set to true to prevent the item getting added

    // check item if numbers only using regex
    var isNum = /^\d+$/.test(event.item);
    if(!isNum){
        jQuery('span.v_error').html("Enter multiple numbers separated by commas (e.g., 1234567890, 4567891231)");
        event.cancel = true;
    } else if(event.item.length !== 10){ // check if length of input is 10
        jQuery('span.v_error').html("Your numbers should be a 10-digit number.");
        event.cancel = true;
    } else {
        jQuery('span.v_error').html('');
    }
});

Now, what happens here is that, when you type in the keyboard, before the tags are created, it will detect first if there are letters or special characters in the input, if there are none and if the number input is equal to 10 digits, then the tag is created. Check the image below.

Bootstrap Tagsinput – Manually adding class on loop-added tags

Now the problem, you want to submit these numbers to an API, then the API checks what numbers are valid or not. Let us say, NPI numbers for doctors. Each doctor has a 10-digit NPI number. So the API checks in the server database which ones are valid or not, then responds back to the website browser which ones are valid/correct or invalid/incorrect. Now we want to display it to the user by highlighting the color, valid numbers are purple/lavender, just like the image above, and invalid NPIs are orange. Also you want to be able to still type in numbers in the input to resubmit.  In our case, by default, when a tag is created, I set the color to purple/lavender.

Here’s the solution.

First we need to create an empty array, this is where we will store the list of invalid numbers.

Check if there are invalid numbers by checking the length of the returned data array, then we iterate from there.

Then we use the add method from Tags Input to add the tags to the input box.

Then we push the invalid numbers to the empty array.

// create an empty array
let invalid_numbers = [];
// If number doesnt exist
// array_of_invalid_numbers will be an array of invalid numbers returned from the API
if(result_from_api.array_of_invalid_numbers.length){
    for (let i = 0; i <= result_from_api.array_of_invalid_numbers.length - 1; i++){
        // this is the Tagsinput method to add tags
        jQuery('input#num').tagsinput('add', result_from_api.array_of_invalid_numbers[i]);

        // we push the invalid numbers to the empty array invalid_numbers
        invalid_numbers.push(result_from_api.array_of_invalid_numbers[i]);
    }

    jQuery('span.invalid_error').html("Some numbers were not found in our database. Please remove or correct the numbers highlighted in orange.");
} else {
    jQuery('span.invalid_error').html('');
}

Then we get all tags added from the input box.

Then we loop through it using the jQuery function $.each().

Then we compare it to the invalid_numbers array.

Then remove or add classes.

// we get all tags by their class
// then we loop using the .each() function
// then we compare it to the invalid_numbers array
// if it matches then we remove the "badge-default" class and repalce it with "badge-invalid"
for(let inva_num = 0; inva_num < invalid_numbers.length; inva_num++){
    // this is the class generated to the tag inputs elements, check it in your browser console
    jQuery('.bootstrap-tagsinput span.tag').each(function(){
        if(jQuery(this).text() == invalid_numbers[inva_num])
        {
            jQuery(this).removeClass( "badge-default" ).addClass( "badge-invalid" );
        }
    });
}

The final result will be like this.
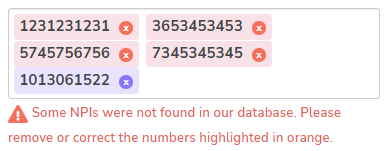
The orange ones are the invalid, and the purple one is the valid.

DNN Custom Editor not working – Fixed

If you are using DNN and trying to edit a text or HTML module, if there are no toolbars displayed in the editor and if the Custom Editor link doesn’t work, then there is a simple fix for that.

Go to Persona Bar > Settings > SEO > Expression Change the value of “Prevent Lowercase URL Regular Expression” with “popUp”

WordPress 5 Page Editor Will Not Let You Exit Page

WordPress 5 has finally come to the WordPress CMS. It has many features that lets it step up it’s game.

One thing I noticed while using WordPress 5 is that when you’re editing a page using it’s custom built Page Editor, if you want to go to another Admin page, it doesn’t let you. It requires you to Save/Update your current page first before it exits you.

Closing the browser doesn’t work either, nor closing the tab. It prompts you to Save the current work before you can leave.

I am sure that the WP team did not put the functionality on purpose but it’s a bug of a script or maybe the browser having some issues or conflicts. I am currently using Chrome as a browser, I don’t know if this happens on other browsers.

This is a bad thing especially when you didn’t edit a content of a page or post and you’re just visiting the page editor to copy some custom code or you’re just checking the page settings so you can make a reference for other pages. You don’t save the page, it’s a bad practice, what if you accidentally touched something or added some texts or codes or accidentally deleted a code or text.

The best way to exit the page is to force close the application, or a technique that I do, click the close button on top while pressing enter.

Specified key was too long – Migration error – Laravel

If you encounter this error when migrating database in your Laravel project, “Specified key was too long” then you might be using an older version of MySQL or MariaDB.

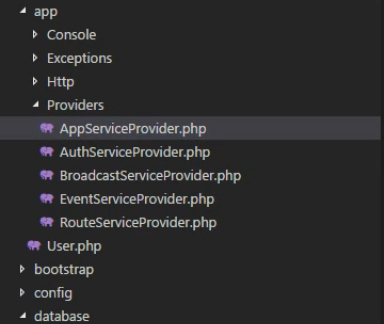
To fix it. Go to your App directory then Providers and open AppServiceProvider.php

Specified key was too long - Migration error - Laravel
Specified key was too long – Migration error – Laravel

Add the Schema Facad at the top “use Illuminate\Support\Facades\Schema;

Then paste this inside Boot function “Schema::defaultStringLength(191);

That’s it! Run your migration again.

Fix the CSS Bug in Divi Theme Front End Builder

This article shows how to fix the css bug in Divi theme front end builder.

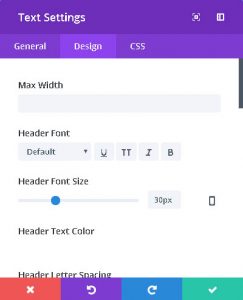
If you’re using Divi Theme from Elegant Themes, then you’d have probably encounterd a bug in the Frontend Builder feature. That is if you added a mobdule/block to the front end and try to edit it’s settings, you cannot click the elements inside the settings Popup.

Here is an image example:

In the image above, if you cannot click any of the elements in that popup settings eg(Max Width, Header Font, Header Color) then you have a similar problem.

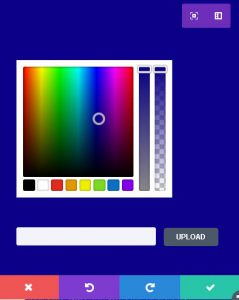
Also if you try to change the the background color of the module, the popup settings background will also change.

Solution:

  • Go to your Theme Directory via FTP or Cpanel File Manager
    • That would be /wp-content/themes/Divi
  • Go to the following sub directory /includes/builder/scripts/ext
  • Locate and Open wp-color-picker-alpha.js
  • Search for the term “absolute”
    • The code should look like this ‘position’: ‘absolute’,
  • Replace the word “absolute” with “relative”.
    • So the code now would be ‘position’: ‘relative’,
  • The same with wp-color-picker-alpha.min.js,
  • Open wp-color-picker-alpha.min.js
  • Search for the term “absolute”
    • The code would look like this ….height:”100%”,position:”absolute”….
  • Replace the word “absolute” with “relative”
    • So the code now would be ….height:”100%”,position:”relative”….
  • Upload and replace the files in your website.

That’s it! Refresh and clear the Browser Cache and enjoy using Divi Theme smoothly without the buggy CSS.